Showing posts with label rotating food storage. Show all posts

Wednesday, June 23, 2010

Cardboard Rolling Shelves

"Rolling shelves" are a great way to rotate canned goods in food storage.

Rolling shelves are a system of shelves where cans are entered at one end and emerge at the other end. In this way, newly purchased cans can be entered and fall into place behind cans that were purchased previously. The oldest cans will always be removed before the newest cans. Keeping food storage rotated is easy.

There are many commercially built rolling shelves which are quite nice. Most of them are also quite expensive.*  There are at least two alternatives. The first is to build shelves from wood. (See the April 2009 post on this blog for a photo of rolling shelves made from wood).(I will someday post a tutorial for those, too).


And, there is another option: Build your own rolling shelves using cardboard! These custom-built shelves are easy to make, very inexpensive (you can practically build them for free if you can find a store or business to give you their used boxes).


 Assembly Instructions
  1. Use two-ply cardboard (sturdier cardboard with two rows of corrugated material).
  2. Cut pieces from the cardboard (a razor blade or x-acto knife works well for cutting). The sizes needed are: 2 pieces for the sides (16 3/4 inches long by 8 3/4 inches tall), 1 piece for the back (5 1/4 inches long by 8 3/4 inches tall), 3 pieces for shelves (one piece should be 4 3/4 inches wide by 16 1/2 inches long, one piece should be 4 3/4 inches wide by 13 inches long, one piece should be 4 3/4 inches wide by 10 3/4 inches long), 1 piece for the upper front brace (8 1/4 inches long by 2 1/2 inches tall) and 1 piece for the lower front brace (8 1/4 inches long by 1 1/2 inches tall)
  3. Measure and mark the sides for the shelves. Mark the line for the bottom shelf: Place a mark 1 1/4 inches up on the back of a side shelf; draw a line from that mark to the front bottom corner of the shelf; mark the other side shelf the same way. (The bottom shelf, when installed, will incline from the back to the front--the bottom shelf dispenses the canned goods from the front). Next, mark the line for the middle shelf: place the mark 5 1/2 inches up from the bottom on the front end. Place a mark 4 1/4 inches up from the bottom on the back end. Draw a line connecting these two marks. (Note: the middle shelf will not actually extend all the way to the back. There will be an opening for the cans to roll through). There is no need to mark a place for the top shelf because it will be flush with the top edge of the sides.
  4. Glue shelves to one side: Use a thick bead of glue from a hot glue gun (don't skimp on the glue). Place a side piece on a flat surface. For the bottom shelf: Place a thick strip of glue all along the line you drew for the bottom shelf. Quickly place the bottom shelf on the glue. Hold firm for 30 seconds or until the glue is set. For the middle shelf: Hold the middle shelf along the line you drew. Note where it should end (it should not extend all the way to the back end of the side piece. Then lift up the middle shelf piece and place a  thick strip of glue along the line. Quickly place the middle shelf on the glue. Hold firm until glue is set. For the top shelf: Hold the top shelf flush with the top and back of the side piece. Note where it should end. Glue along the top edge of the side piece to where the top shelf will stop. Quickly place shelf on glue. Hod firm until set.
  5. Glue shelves to the other side. Place a thick strip of glue along the edge of each shelf. Quickly press the side onto the three shelves. Hold firm until glue is set. Next, reinforce individual shelves as necessary by placing a thick strip of glue around each joint.
  6. Glue the back piece to the back of the shelves.
  7. Glue the front pieces to the front of the shelves. First, bend the front braces to extend around the front corners. Second, glue the top brace so that the bottom of the brace is flush with the bottom of the middle shelf. Third, glue the bottom brace so that the bottom of the brace is flush with the bottom of the bottom shelf.
  8. Optional: Create a ramp. If the cans don't roll from the back of the bottom shelf, cut a notch in the back of the bottom shelf, bend the cardboard upward, and glue the cardboard in place to create a little ramp to force cans to roll toward the front.
  9. Optional: Create a grip: Cut a notch on both sides of the shelf near the front just above the bottom brace to allow easier grip of cans when removing from shelf.
  10. Optional: Reinforce glued seams with Gorilla Glue.
  11. Optional: Paint shelves. 
Photo Tutorial
 
This picture shows the flattened cardboard box. 
We placed a can on the box to decide what size to cut the cardboard. The measurements given in the "assembly instructions" above are for a standard size can, but if you want to make custom shelves for larger or smaller cans, you can easily do it by measuring the can and customizing the width (and possibly the height) of the shelves.

This shows the cardboard box after we have cut a few of the pieces. 
(We thought it was nice that "Advanced Manufacturing Corporation" happened to be printed on the side of this cardboard box :) ).


This picture shows the shelves after being glued to the side piece ( "step 4" from the "assembly instructions" above).


This picture shows the notch cut in the bottom shelf to aid the cans in rolling forward ("optional step 8" from the "assembly instruction").


This is the finished shelf. The cans are loaded from the top front. Each can will roll down toward the back, then drop through the opening on the middle shelf and then roll toward the front on the bottom shelf where it can be removed.
This picture shows the shelf loaded with cans. This shelf will hold 12 cans. However, after you have made one shelf, you can customize your own shelves by cutting longer, shorter or taller side pieces. You can customize your rolling shelves to fit the shelves or cupboards where you will be using them. The front braces can also be used for labeling each shelf.


This is another view of the finished rolling shelf.


Original Website and Inventor

This idea originally came from another food storage blog, which a friend told me about. Click on the link below to go to that blog. You will see a picture of the blog author's own food storage room which has several of these cardboard rolling shelves. The shelves have been painted white and labeled. This food storage room is well-organized! The blog also has a diagram for building the food storage shelves, some instructions, and measurements for building different size shelves.

The Pantry Panel Blog


Another blogger posted more instructions and a video for making these shelves.

FoodStorageMadeEasy.net

 
* Food Storage Made Easy has a link to a site that sells rolling shelves fairly inexpensively. I've never purchased anything from this company, so I can't vouch for them, but their shelves look good and the price is the lowest I've ever seen for rolling shelves. Here's the link:

TheCanOrganizer.com

Saturday, May 1, 2010

Rotating Food Storage

I hear people talk about "rotating food storage." What does that mean, and how do you do it?
"Rotating food storage" means to regularly use and replace the food in your storage.

Isn't it easier just to buy a year's supply of food, then leave it in place? Afterall, many foods, such as wheat and beans, will last for decades.
It is true that some foods can be stored for decades, but here are some good reasons to rotate your food storage:
  • You eat the foods you've stored before they become outdated, and while they still retain their optimal nutritional value.
  • By "storing what you eat and eating what you store" your family (and your digestive system!) are used to eating the food you have in storage. If you store wheat for 30 years, or even 5 years, but never eat wheat, it will be a shock to your system, and your family, if you suddenly begin to eat large amounts of wheat out of necessity.
  • If you store food that you don't regularly use, it will be much harder to know how to use it in an emergency. You may not have the skills and experience, or even the right ingredients, to prepare tasty, nutritious meals.
  • Food storage isn't just for emergencies, it is also part of a practical, economical lifestyle. By storing food, and regularly using your food storage, you have food on hand. This will benefit you in small, personal "emergencies" such as sickness, storms, sudden unemployment. You will also have less trips to the grocery store, and grow more accustomed to buying food on sale, or in bulk quantities, both of which will save money in your grocery budget. For more ideas on this, see the June 2009 posts on this blog.
How do I rotate my food storage?
There are many ideas for how to rotate food storage. Here are a few:

Idea 1: Replenish once a year
This has been the simplest method for our family. When we were first beginning our food storage, it took us a while to save enough money to do this. However, once we had established this pattern, we began setting aside a little money each month for food storage replacement. At the end of each year, we have enough set aside to purchase the majority of our food storage. In February of each year we purchase enough wheat, flour, other grains, pasta, beans, lentils powdered milk, sugar, yeast and oil to last our family for an entire year. We bring it home and store it in 5 gallon buckets in our basement. (For more information on storage containers, see the March 2009 post on this blog). The first year we did this, we purchased a two year supply. At the end of one year, we still had a year left. We then purchased a year supply, (so we again had a two year supply). We eat the older year's food first, and we follow this pattern every year. This is how we replenish the majority of our food storage. There are other items that we replenish more often. For example, we usually have a 6 month supply of these foods: canned goods (tomato sauces, fruits and vegetables, cream soups, broth, tuna, etc.), frozen goods (frozen fruits and vegetables, butter, meat, tortillas, chocolate chips, etc.) and other supplies (peanut butter, barbeque sauce, ketchup, jello, cake mix, crackers, chips, raisins, nuts, etc.). Throughout the year we watch for sales on these items and then stock up when an item is on sale, or if we have a coupon (part of our grocery budget each month is earmarked for food storage). Also, because we store these items on shelves in our basement, it is easy to see when our inventory is getting low. Initially, we took time to find which stores/brands we liked best and were most economical. Now, it is easy to know we are purchasing food that is the best food for our budget and tastes. (For more information on getting started and using food storage in a budget, see the March 2009 May 2009 and June 2009 posts on this blog).


Idea 2: Make a chart
This idea comes highly recommended from several people who originally followed guidelines that Kathy S. gave them. (She got her original idea from an article in the February 1996 LDS church Ensign. Click here for the link).


First, determine what food you store, and how much of each food you want to have stored.

Second
, classify your food according to where you acquire it (grocery store, warehouse store, church Home Storage Center, garden). Choose a color for each place (example, grocery store could use a green recipe card, warehouse store could use a pink recipe card, etc.)

Third
, purchase a card caddy, or make your own using a poster board and recipe cards. There should be one pocket for each food in your storage.


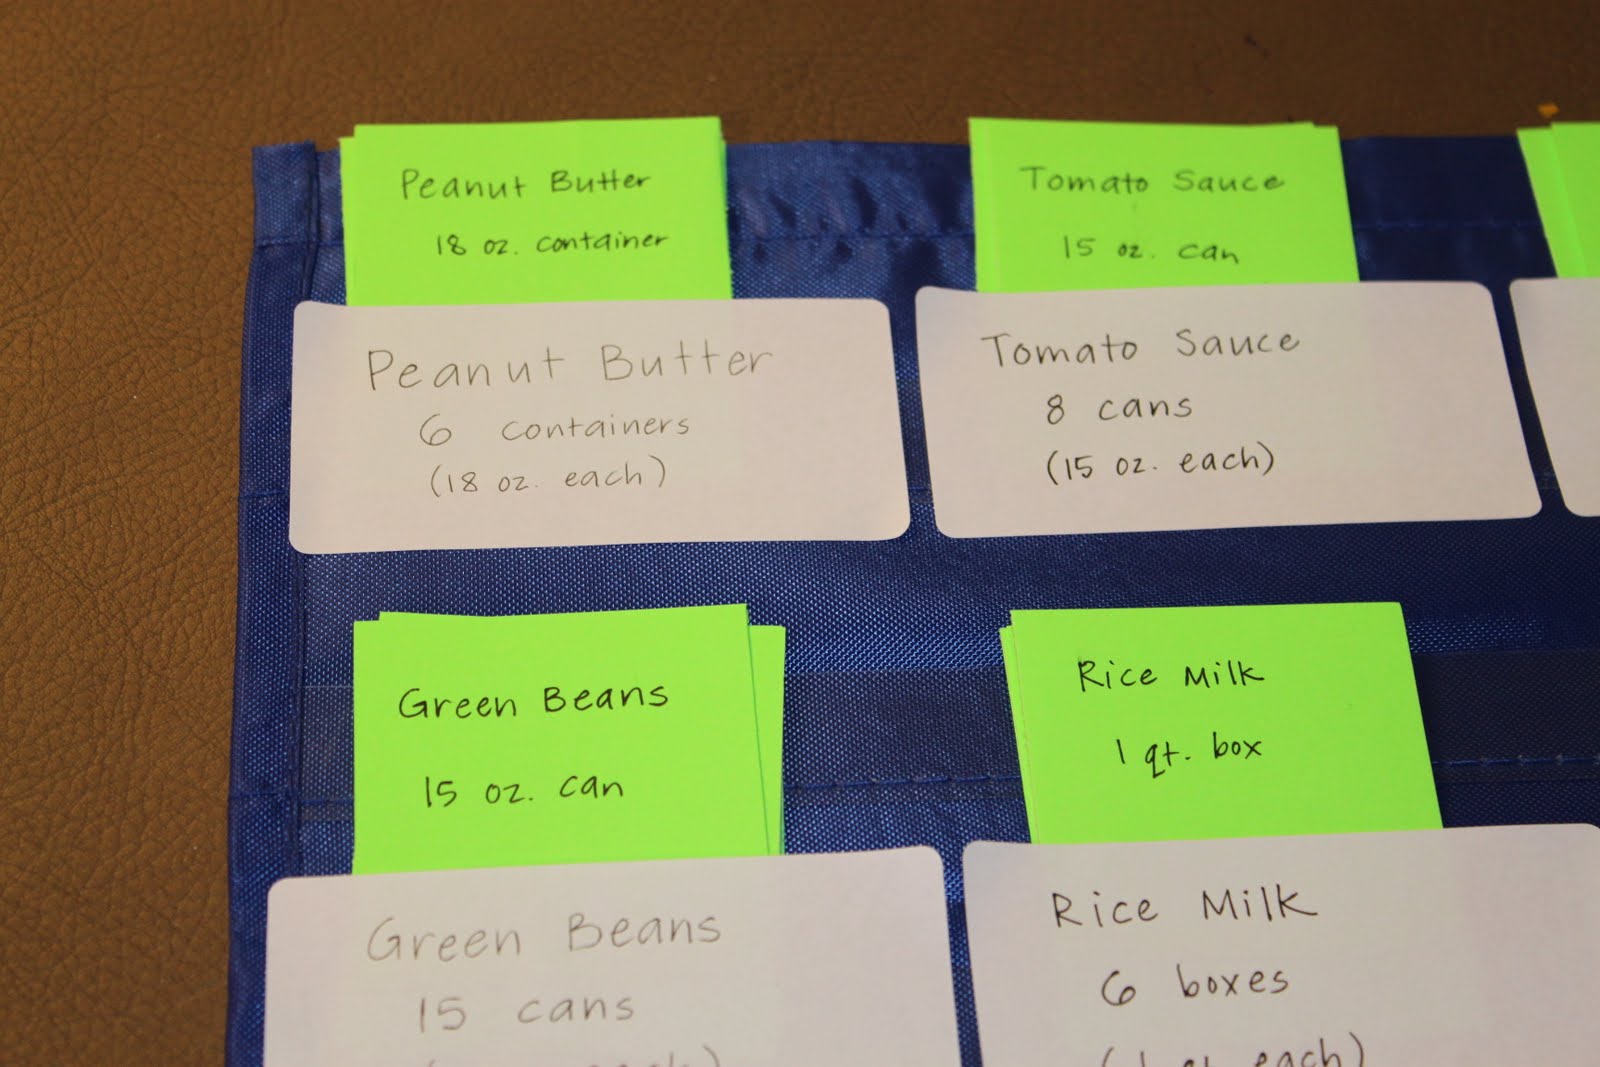
Fourth, label each pocket with the food, the type of package or unit that you purchase it in, and the number of packages or units that you want to have stored. For example, "Peanut Butter, 6 containers (18 ounces each)."

Fifth
, use the colored cards from step two and label one card for each individual unit. For example, I purchase peanut butter from the grocery store, and I want to have six containers of peanut butter in my food storage. I have chosen green cards to represent foods I purchase from a grocery store. I will label six green recipe cards with this information: 1 container of peanut butter (18 ounces).


Sixth, I will place the colored recipe cards in the pocket with the corresponding label. For example, on my card caddy, I will have a pocket labeled, "Peanut Butter" and inside that pocket I will have six green cards, also labeled "peanut butter."

Seventh
, Hang the card caddy in your food storage room. Then, tape an envelope on the inside of one of your kitchen cupboards. Each time you take an item from your food storage room, pull the corresponding card from your caddy and take it to your kitchen, then place it in the envelope. For example, if I remove one container of peanut butter from my food storage room, I will also remove one green card, labeled "peanut butter." I will bring the green card to my kitchen and place it in the envelope.


Eighth, When I plan a trip to the grocery store, I will look inside the envelope in my kitchen. I will see one green card for peanut butter. I will add "peanut butter" to my grocery list. When I come home from the store, I will take the newly purchased peanut butter to my storage room, along with the green card from my kitchen. I will replace the peanut butter on the storage shelf and the card in the caddy.

This is an excellent system for organizing food storage and keeping an accurate inventory of what is stored and what needs to be replaced. The colored card system is an excellent visual, because it is easy to look in the envelope in your kitchen and immediately see which items need to be purchased from which place. This system only takes a little time to set up, and it is easy to maintain once you are in the habit.

Are there shelves or other special helps for actually storing the rotated food?
Tutorials for rolling shelves for canned goods are forthcoming on this blog. The April 2009 posts on this blog give some examples of where/how to store food in your home.

Are there any foods I don't rotate?
Well, all foods need to be rotated, but there are some foods that need to be rotated less frequently. For example, I regularly use and replenish nearly all the foods in our storage, but there are two foods that I have stored, which I rotate less frequently. They are: dehydrated butter and dehydrated eggs. Fresh eggs only last a few weeks, and I don't own any hens. I use eggs in cooking, but I don't have a source for fresh eggs in an emergency. I purchased 4 cans of dehydrated eggs and keep them in storage for 4 years, until they are almost expired. Then I use them, and replenish them. I do this because they are expensive to purchase, so it's not economical for me to constantly be using them and replenishing them, but I want to have them on hand. (I purchased mine from Emergency Essentials at www.BePrepared.com, but I am sure they are available from many other places).

Are there other exceptions to rotating?
Yes. I have written about special dietary restrictions and rotating food in the previous post on this blog (May 2010).

What about rotating water?
There is also a post about water on this blog (April 2010).